Recently, I picked up a nice condition 1998 Fender MIM (Made In Mexico) Standard Stratocaster. Actually, really really nice shape, almost like new, hardly a scratch, no fret wear; there were still traces of the plastic film overlay on the pickguard. I wasn't really in the market for another Strat, but when this was offered as part of a multi-item trade deal, I thought it might make a decent first electric guitar for our musically inclined son, so I went for it.
Strats and Teles have been around for more than 60 years, which means most of their
history and lore predate the internet. In years past, this particular color combination - a black body with white pickguard - has had a few nicknames: "Tuxedo", "Black and White", and "Penguin", among others, but no one ever uses those terms anymore. I like penguins (who doesn't?), so we'll call this Strat the Penguin.
The Penguin style is possibly the single most iconic of all the Strat color combinations, and a lot of great music has been played on Fenders with this look. It's a great classic look, and we should probably just keep it the way it is, but oh well, that's not how we do things around here. We always mess around with our toys, until they look like something that belongs to us, and not someone else.
As soon as he heard I'd picked up the Penguin, David in Massachusetts suggested a style makeover, and sent a picture of what his dream Strat would have looked like during his own teenage years - a black body, rosewood fretboard, and a reddish brown tortoise pickguard:
Vary classy! A few days later David sent along a new Fender brand tortoise pickguard, and I ordered some Allparts cream colored pickup covers and knobs, and a tortoise trem cover. So now, let's get to work and make this happen.
First I'll say that although I have a workbench for the messier stuff I do, such as tube amp work (and rebuilding bikes), I like to do guitars on the kitchen table - there's an even, unshadowed northern light from the big sliding glass doors, and coffee and/or beer are a lot closer to hand. As usual, the big old pink towel goes over the antique '50s table, to protect both the guitar and the table, and family harmony as well.
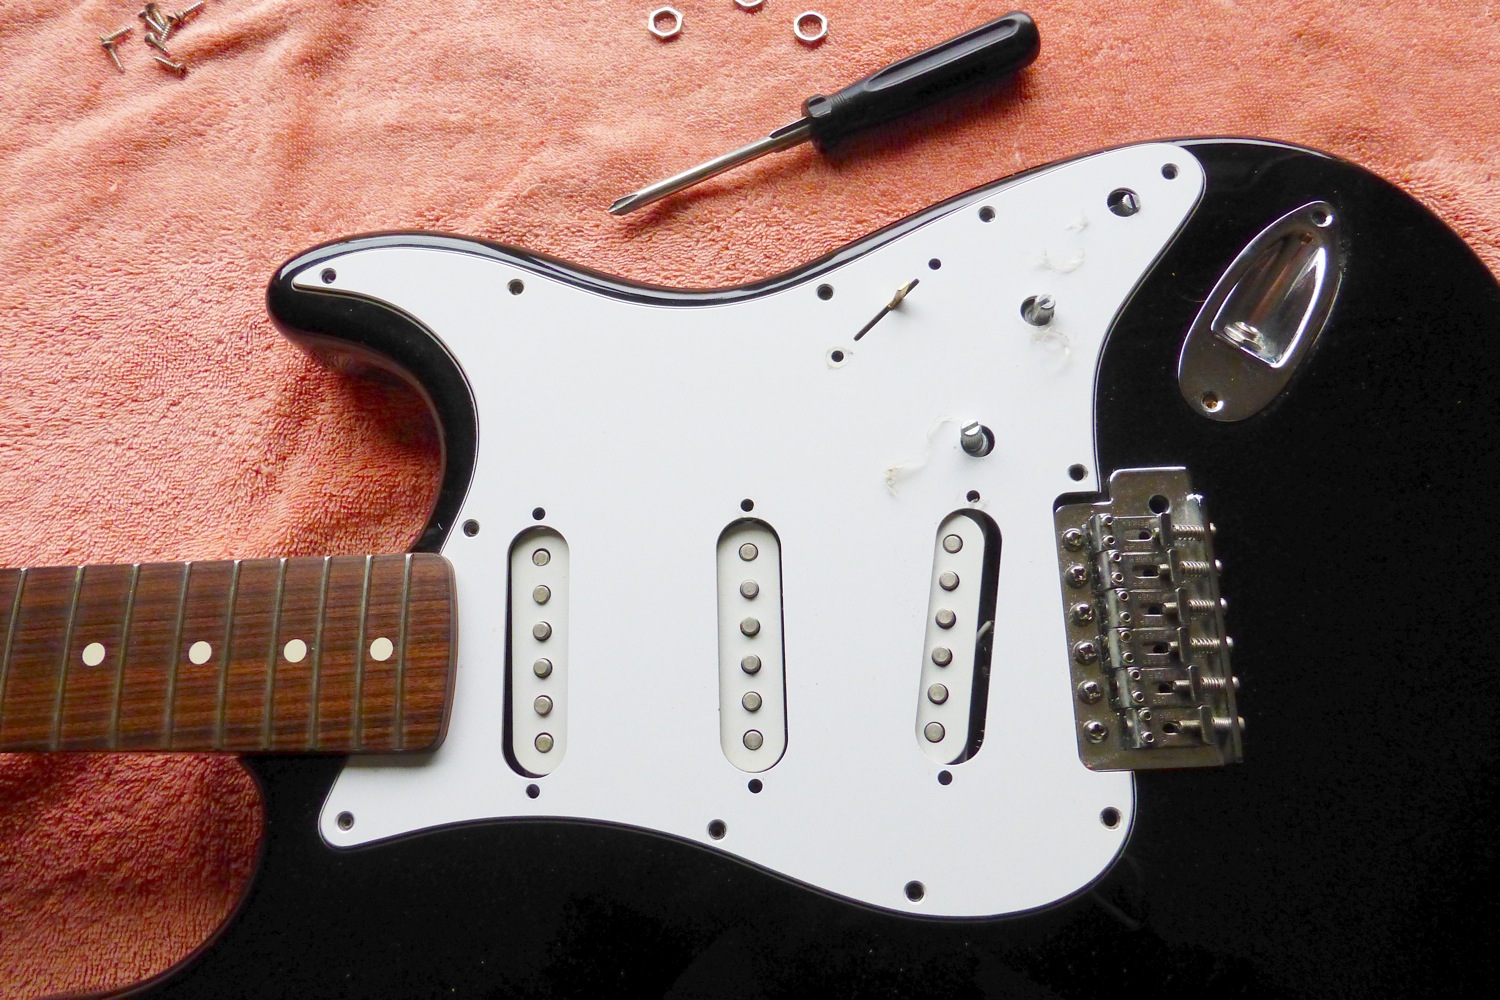
This ain't going to be a Penguin much longer - first thing, after removing the strings, the woodscrews holding the pickguard to the body are removed, as are the machine screws holding the switch and pickups. Also, the nuts securing the potentiometers, or "pots", are loosened up with the correct tool, a Craftsman 13mm deep socket - more about that later. Now, all we have to do is lift off the 'guard, and everything else just sits there:
Here's a close up of the control area of the white pickguard; note the remains of the original transparent plastic film overlay:
Next, our new parts. While sometimes I "cheap out" when I do low-buck projects, it only makes sense when doing a makeover of an essentially new guitar, to get as high quality parts as possible. In this case, we can't go wrong with Fender and Allparts brand stuff:
Next, remove the old pickup covers, and place the new ones over the pickups. We'll take the new tortoise pickguard out of the bag; in the next picture, it still has the plastic film on it, and looks redder than it really is. Once we take that film off, the actual color is a bit browner. When guitars are assembled at the factory, the film is kept on, to reduce scratching both at the factory and also later at the music store. Today, we'll zip the film off right away, and use an old fashioned precautionary method to minimize scratches - working slowly and carefully.

I didn't take any pictures while fitting the pickups to the pickguard, mostly because it's a two-handed procedure. Also, everyone's got their favorite method, whether to flip the pickguard over and install the pickups down over it, or hold the pieces sideways, or to hold each pickup with the springs balanced in place and slip it into its respective hole, while starting the screws from the top by hand - that's the way I do it, but whatever works best for you, okay. In any case, be very, very cautious around the really thin pickup coil wires, between the coil itself and the solder joints - one slip, and it's time for a new pickup.
These pickups seemed to have larger diameter machine screws, and the Allparts vintage-spec covers had holes a bit too small, so it was necessary to ream them out slightly with an oval section hobby file. Just about 5 seconds of twirling the file gets it:
After installing the pickups, place the pots one by one into their holes, and tighten the nuts, first by hand, and then with the preferred tool - a shiny new-ish chrome plated Craftsman 13mm deep socket. The nicely done plating on the socket reduces scratching, almost to none. Use no ratchet handle, just do it by hand - hold the socket lightly between your fingers, and at this point just get it barely snug:
Then, re-attach the switch. Before final tightening of the pot nuts, flip the pickguard over and check the alignment of the pots, so the wiring doesn't get pulled too tightly. Also, inspect the whole control section, including the solder joints; in this case, the black wire from the neck pickup pulled off its grounding point on the volume pot - an obvious cold solder joint, which had to be reattached. The tape holding the neck and middle pickup wires together also needed a re-wrap.
One thing I found out is that Fender obviously listened to everyone back in the '90s, when it was obvious that their Standard line MIM guitars had sub-standard electronics. My own
'91 MIM Strat came from the factory with nasally, thin sounding pickups and cheesy pots and switch. By 1998, and possibly earlier, Fender was using decent quality CTS pots and CRL switches, and the ceramic magnet single coils in this particular Strat are very good sounding - sweet and full bodied, with a bright clear top end, and balanced lows and mids - really Hi-Fi.
In fact, Ron, the previous owner, had installed a Joe Barden pickup in the neck position, and took it back out soon afterwards, since it didn't sound as good as the stock pickup. I played this Strat both before and after the pickup swap, and again when the Barden was removed, and I totally agree with Ron. I could go on here about tone actually being in your fingers, and how a lot of players go insane, as well as lose a lot of cash, substituting pickups, bridges, and other parts, chasing after some mythical tone, but that's another story.
Here's a shot of the reattached pickup black wires at the volume pot, with a "hot" flowing solder joint:
Speaking of hot joints, marijuana became legalized recently here in Oregon, which I discovered when I
joined a rock cover band. But I digress. Here's a picture showing the nice, large pickup cavities on this MIM body - a great idea, makes it easier to fit a humbucker or a P-90, and placing a loaded pickguard down over a body is a whole lot easier, without worrying about having every wire exactly in place. Also, that's some thick-ass paint in there:
Next, final tightening of the pot nuts. Remember, this isn't an auto engine, and nothing needs to get death-grip torqued, just snugged down; so hold the 13mm socket lightly, and when it starts slipping between your fingers, that's plenty tight enough.
Before putting all the pickguard screws back on, do a quick electrical test. I have a short jumper cable with a 1/4" plug on one end, and bare wires on the other, that the alligator clips on the probes of my ancient Sperry multi-meter can grab onto:
This time, everything's okay, hooray. If we had done any major replacement work, it's a good idea to put just one string on, plug the guitar into an amp, and make sure the volume and tone pots all work. But in this case, since it was fine before, it should still be good. Is that being foolishly optimistic, or what?
So now, we can put all eleven of the pickguard screws back in. First, a couple of points: in the picture above showing the new package of knobs, you can see two wood screws at the top of the photo - these are special screws which have a wider diameter un-threaded shaft section between the head and the start of the threads. These go into specially enlarged holes at either side of the bridge, and help to locate the pickguard more exactly so the tremolo bridge plate doesn't bind against the edge of the 'guard. Not all Strats have this feature, but some do.
Also, make sure to run all the screws down only about 3/4 of the way at first, and wiggle the pickguard a bit so all the screws are equally mis-aligned. I say "mis-aligned" because whenever you change pickguards, no matter how high quality the part, the screw holes are never going to be in exactly the same location - so spread out the error, and that way none of the screws is going in sideways.
Final tightening: just like putting on an automobile tire, go around all the screws and tighten each a turn at a time. And remember, you don't need to tighten these screws a lot; you don't want to strip out the screw holes in the body, or deform the plastic material of the pickguard. Look closely at an attachment screw where it goes down through its hole - if you tighten too much, you'll see the plastic start to deform and dimple, and begin to create a divet. As time goes on, these stress points will turn into fractures - not a good thing. So, run each screw down to just barely snug with a thumb and one finger on the screwdriver, and then back off a 1/4 turn - you'll see that deformation disappear. And no, that pickguard ain't gonna fall off, unless... Uh, what exactly
do you do with that Strat, anyway?
The next picture shows my big mistake - I was in too much of a hurry when I ordered, and got different color knobs and pickup covers. The knobs are "Cream", and the covers are "Vintage Cream", which has a small touch of greenish tint to it. I like that vintage cream color, so I've already ordered another set of knobs, and in a few days, we can see how it all looks when we're done.
In the meantime, here's a shot of the body as it sits right now. Not bad at all, and getting close to classy:
And here's where spending a bit more, and getting the correct part pays off. This is an 18 year old Fender Mexico Stratocaster, and the brand new USA pickguard was made by Fender as well - notice how precise the fit is, both around the tremolo plate, and at the neck. That's not a 22 fret neck with a fretboard overhang covering a sloppy fit - it's 21 frets, and the curve at the end of the neck matches the pickguard's curve very close to perfectly.
Depending on your browser, you can probably click or tap on the photo above to get a closer look.
Next time in
Part 2, we'll put on the tortoise patterned trem cover and "vintage cream" knobs (as of this writing, they're still in the post, but should be here soon), adjust the pickup heights and general setup, then string this black and tortoise beauty up and take it for a spin.