Okay, this project Strat is no longer a 1991 MIM (Made In Mexico) Fender Stratocaster: it's now officially a '90s Parts-O-Caster. Last week I ran across a nice MIJ (Made In Japan) two color sunburst Strat body for sale locally:
 |
| Mid '90s MIJ 1957 Reissue Series Stratocaster Body |
It came from a mid-'90s Japan Fender 1957 Stratocaster Reissue Series guitar; the previous owner (Nashville-Cat Tele-slinger extraordinaire Chris Wade) had used the neck for a custom build, and the body had been sitting around for some years. It's just a great slab of wood: thinly finished, mid-weight, tight grained alder, with the perfect arrangement for a toneful multi-piece body - center block running straight down the middle, plus side wings. Hang it up by a wire, and tap on it with the handle of a screwdriver, and it makes an almost marimba like note! Yeah, it's got a few scratches and dings, but the finish is nearly flawlessly done, and it feels great in your hands. Also, and this is strange and cool - the finish smells incredible, a lot like an old Japanese lacquer box.
Luckily, since it was directly patterned from a 1950s Strat, the body was already drilled perfectly to accept the 8 hole '50s reissue gold anodized aluminum pickguard that I had installed on the
Demon White '91 MIM Strat. Since that has an 11 hole body, a couple new pickguard mounting holes were added to fit properly:
 |
| 1991 MIM Strat "White Demon" |
This guitar became the "White Demon" after its incredibly thick factory finish, obviously possessed by some evil spirit, had successfully resisted
all efforts to alter the Beach Boys White color. Since the time of the above linked blog post, I've also tried both oil and water based stains (no effect), different brands and colors of shoe polish (shrugged them off), and even Olde English dark finish restorer (made that stuff cry like a baby, while it walked away laughing).
Luckily, most all of the parts from the White Demon bolted right up to the "new" body, no problem, except for the tremolo bridge. Fender used different string spacings, and different mounting screw dimensions, for various Strat bridges over the years. After finding that the MIM bridge didn't line up with the mounting holes in the MIJ body, I got on the web, and ended up gaining a little knowledge, and a large headache. There's too much random and often misleading information, most of it posted by angst-ridden forum lurking hobbyists obsessing over minute arcane details.
 |
| Obsessing Over The Details |
It looked like I needed a new tremolo bridge. There's a lot of choices out there, but as I found out when looking for
size reducing retrofit tuning machine bushings, you can order part after part after part on eBay, most of which don't actually work or fit, and there goes three or four weeks out of your life, as well as a bunch of cash. Bad enough with a $7.00 set of bushings, but guaranteed to put you in a bad mood with a $50 - $100+ bridge.
So before ordering online, I put up a WTB (Want To Buy) listing on local craigslist, and the next day I had a nice Gotoh trem that the previous owner had removed from a '00 Japanese Strat when it was new. The only catch was that the original bent steel bridge saddles with the "Fender" stamp had been replaced with some other saddles of unknown origin. The good news is these replacement saddles are the correct size, have excellent build quality and finish, and the best news of all was the price: zero, zip, zilch, nada, free, gratis, no chargealoni. I ended up giving the guy a re-tube set for his old Champ Amp, because doing a trade feels good.
I've since learned that these saddles are from Allparts, and are Japanese made reproductions of stock 1970s Stratocaster cast zinc saddles. From a distance, they even look a lot like the vintage '50s style stamped steel kind:
 |
| Gotoh Trem Bridge With Unknown Saddles |
After putting on new strings (.009 to .046 - a good blend of low string twang with bluesy high string bend-ability), adjusting the the neck into a place where the E strings are equidistant from the edges of the fingerboard, and setting saddle height and intonation, it was time to play this Parts-O-Caster.
How does it sound? As expected, it's not too very different from the White-Zombie O'Caster; after all, it is still basically a Strat. Also as expected, the cast saddles and large Gotoh zinc block sound different than the previous stamped sheet steel saddles and brass block. Then again this MIJ body is fine grained alder instead of the MIM's unknown wood, so who knows what component(s) made any tonal difference. Overall, it's maybe a bit "airier", slightly more top end, but still well balanced tonally - well okay! Good enough for Rock And Roll.
 |
| Good Enough For Rock And Roll |
And now, here's a few notes about some of the idiosyncratic (meaning: weird, odd, unexpected, or just plain wrong) details of this Mexi-Japa-Parts-O-Caster:
• A gold anodized pickguard just looks cool. Plus, pickups hanging off metal instead of plastic seem to give more of a Telecaster bridge pickup kind of bright shimmering tone and twang. Whether that's true or not, a gold pickguard still looks great, and as a plus, they never warp, and there's no need for an additional electrical interference shielding layer.
• Where's the volume control? I've always played finger style, often planting my right hand on the bridge of whatever guitar, and the Strat volume knob position always felt too close, and in the way. For that reason, I stayed away from Stratocasters for a long time until (duh) I figured out I could move things around. So - a volume pot farther away from the bridge, and just one tone knob. The hole where the volume control used to be is filled with a really old nickel plated steel plug.
 |
| Old Strat Knob |
 |
| Gibson Speed Knobs |
• Stratocaster knobs, with their weird dainty skirted design and tiny grip area - whose
bright dumb idea was that? They're kind of hard to lay a finger on and spin or nudge - if your Strat has high quality potentiometers with good stiff back-feel to them, you've got to use thumb and a finger to grab a knob and twist it. That's okay for sitting on the settee and making delicate volume adjustments between sips of your liqueur, I guess. For beer drinking folks like me, Telecaster style knobs are a big improvement, and a lot of serious players, including Lowell George, have used those on their Strats. But being metal, they can still be a bit slippery at times, especially the '60s style flat tops with shallow knurling.
However, jumbo sized Gibson "Speed" knobs are made of some sort of plastic that, although hard and shiny, is really kind of, well - sticky, and surprisingly grippy. Even during a really hot, loud, and intense gig, sweat pouring off you and dripping everywhere, maybe even some beer and drool flying around too, barely able to hold onto a pick, you can still reach down and hit that Speed Knob with the side of any finger or, heck - the side of your whole darn hand, and it moves, man - turn it up quick, turn it all the way up, 'cause it's time for a slamming solo.
 |
| Gotoh Tele Knob |
• The tone knob is a heavily knurled nickel plated brass '50s domed Tele style, made by Gotoh in Japan. Extreme quality and finish, but the real reason it's there is because of the set screw, which Strat and Speed knobs don't have. It's firmly attached to a pull pot, which is wired to instantly bring the neck pickup into whatever mix the selector switch is already in - a good way to get the elusive, and for most Strats, mythical bridge + neck pickup combo.
 |
| Daka Ware Switch Knob |
• You can't see this, but the switch is a 3-way, left over from a Tele build. I can't remember what brand it is (maybe CRL?), but it's old fashioned, high quality, with really stiff action - no problem at all getting to, and staying at, those in-between positions, even though it doesn't have the 5-way detents. The switch tip is the only really vintage part on the whole guitar, an actual 1950s Daka Ware knob, with tiny patent numbers cast into the bottom flange - a gift from friend David, who somehow manages to find cool stuff like this. Also, I like the '50s style barrel knob, since it's heftier than the usual petite Strat switch tip.
 |
| What's Up, Jack? |
• I've talked about the reversed jack boat in another post about
Tele and Strat output jacks; that's not my idea, but it's a good one. And is there a down side to an upside down jack cup? Hands down, it's two thumbs up.
 |
| A Duo Of Duos |
• The bridge and middle pickups are recent Duo Sonic reproductions, and darn good ones: Tonerider Squier Classic Vibe Alnicos, with flat top polepieces. Back in the '80s and early '90s, when you could find a Duo Sonic or a Musicmaster for less than $50 (the whole guitar), I used to pick them up for gifts - and with their 22 1/2" short scale necks, they made great travel guitars, too. One set-up trick I usually did before giving a little Fender away, was to take the pickup cover(s) off, in order to get the pole pieces a little closer to the strings. Suddenly a 'Sonic or 'Master wasn't quite so tame: noticeably louder and, with the coil as well as the magnets nearer to the strings, tonally fuller as well Is that the reason those old Tele bridge pickups with the magnets flat against the top of the bobbin sound so good? Maybe. In any case, these modern repro Duo Sonic pickups have great tone, possibly better than the originals.
 |
| El Cheapo $5 Pickup |
• The neck pickup is one of those horrible el-cheapo pickups you might see on eBay like this: "Startocastor pickup lot! Ten 10 pickrups 29.95! No ship Fee free!" Maybe that's what it is; it was in the bargain bin at the local, non-big box, real music store (The Buy And Sell Center! Eugene! Go Ducks!), and I snagged it for $5.00, kind of as a cheap joke. But. It's not bad, not bad at all, and that's no joke.
How many times have we heard someone say that a particular pickup sounds very "P-90 like"? Way too often, but - this ceramic bar magnet pickup does, in a big way: sweet and round at low volume, fat and gritty when pushed. A nice neck pickup, with a very smooth and jazzy tone. Okay, it does squeal a bit at high volume, but that's cool in a rock and roll kind of way. Interesting, and good enough as a cheap experiment, until it gets replaced by whatever comes along next.
 |
| Nickel Neck Plate, Slotted Nickel Screws |
• Now here's a real personal idiosyncrasy: slotted screws wherever possible, and as many of the parts in nickel plate as I can find. The tuners, neck plate, strap buttons, and Tele style knob, all made by Gotoh, plus most all the screws, even the trem springs and claw, are all nickel, and maybe someday I'll find a jack cup and bridge in nickel, too. And, no, slot head screws and nickel plating won't make you play or sound better, unless you really believe they do. I just like the look of them - all the really cool old stuff has slotted screws, and nickel ages a lot better than chrome, gaining a nice warm vari-colored patina over time.
 |
| International Neck Of Mystery? |
• About the neck: according to legend (and if it's on the internet, it must be true, right?), first year 1991 Fender Mexico production guitars had necks and bodies made in California and shipped south of the border for assembly. Is that true? Does it even make any difference? I don't know.
I've played some Mexican Strats and Teles from various years that were really nice playing and sounding, good quality guitars. Other MIMs were, well - not so much. A '93 MIM Strat I used to have was merely okay; nice looking but unexceptional tonally, and changing pickups and other parts didn't help very much. Have you ever played any '70s Fenders? There was a huge amount of variance in quality control back in that era - many were truly awful, a very few were great, and the majority were just okay, not good or bad, and they were all made in the same U.S. factory.
 |
| Starting To Get A Nice Patina |
Anyway, this particular neck is a darn good one, 100% stable, nice feel, good tone, and I like those vintage-y narrow frets a lot - they seem to be great for bends and vibrato technique. And having 21 frets, with no funky little one fret overhang, is a good thing. 22 fret Fender necks are just a passing fad that people of the future will look back on with sad bemusement, shaking their heads in wonder. Also, after 24 years, this Mexi neck is just starting to get a nice 'wabe sabe' patina. Although I could wish it was a bit chunkier (and I'll have to satisfy that jones with a fat-neck Tele project next), its basic quality, as well as the nicely done setup by David, was why I bought the White Zombie Demon Strat from him in the first place.
Compared to the neck, the original MIM body, 5 or 6 pieces of an unknown wood glued together, encased in an incredibly thick polyester skin, was decent in its way, with average, not bad but not great, quality. Now, the combination of the beautifully made MIJ body and this stable, toneful MIM neck add up to one very playable, and fine sounding guitar. Sure, it took a while to get the parts together, as well as taking time to set it all up properly, but the trip itself can be as satisfying, and fun, as reaching the destination. In any case, something tells me we're not done with this journey yet.
For a progress report on how this Strat sounds in a real live rock jam setting, check out my post
Rock And Roll Time, Again. In it I talk about joining a local rock band, and having to quickly put together a performance rig, including effects pedal setup, out of whatever junk I could grab out of the garage.
• And lastly, here's my take on the whole "where was it made?" thing - maybe it's a statement, maybe it's a joke, but - Belgium is about the coolest name for a country, ever. And besides, that's where the legendary
Hercule Poirot was born. Good enough for me.
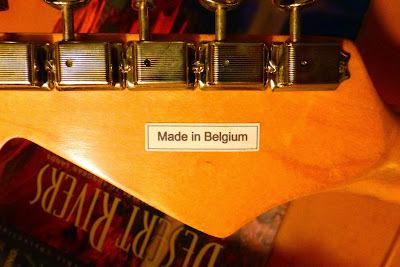 |
| Made In Belgium? Really? |
Next, in Part 4, we'll finally get around to installing a tone control pot, after we audition a few
tone capacitors first. Also, who knows, there may be a new pickup or nickel plated part to put in, too, so stay tuned.
To see the first two installments of our journey with this Parts-O-Caster, go to
Part 1, and
Part 2.
As always, click or tap on any photo above to access larger, higher def images. All photos except Mr. Monk were taken with a Lumix ZS-25.


